Sunday, August 27, 2017
Issue #547: A Losmandy GM811G Comes to Chaos Manor South
Thanks to my
recurring back problems I recently put my Celestron C11 Schmidt Cassegrain and my Atlas
EQ-6 and CGEM mounts up for sale. If you are a Facebook friend of mine, you
know all three went to new owners amazingly quickly. When the dust settled, I
was left with a single SCT, my Edge 800, and a single mount, my Celestron AVX,
which I like a lot, but…
I recently
did some tinkering with the AVX—well computer
tinkering, mechanically it is all you can expect from its price class—and that brought
some improvement to its tracking ability for deep sky imaging. Tightening up my
polar alignment with Sharpcap, and really
bearing down on those PHD2 brain icon settings took me from an RMS error of 2”
or a bit more on a steady night to 1” or a bit more (or sometimes less) on an
evening with superior seeing. The mount is now really all I need for shorter
subs, 300-seconds or less, in the backyard. If I have a relatively light payload onboard the VX.
The thing
is, however, that I sometimes want to go a little heavier and longer than my
11-pound 900mm SkyWatcher 120 Pro ED refractor. Sometimes I want my Edge 800
SCT for imaging, and sometimes I want my 6-inch f/8 achromatic refractor for
visual use. The SCT is not just heavier than the 120, it’s got more focal
length to the tune of 1400mm even with the Edge focal reducer in place. The
achromatic refractor? While it’s at the limit for me at 25-pounds or so, it’s not too much for the AVX, but I am
happier with it on a heavier mount—I’ve used it almost exclusively on the CGEM.
What to do,
then? Well, it looked like stingy old me would just have to buy a new mount.
One that would not break my back nor my bank account. I did quite a bit of
looking and reading and pondering and narrowed my rather small field of
candidates to two, the iOptron CEM60 and the Losmandy GM811G.
I’d had the
opportunity to see my friend Bruce’s CEM60 in action last summer at the Maine
Astronomy Retreat and had been impressed. This innovative “center balanced” GEM
looked good, worked great, and at around 2800 dollars (once you buy the nice
tri-pier tripod and a couple of other “options”) would not decimate my wallet.
Most importantly, iOptron has kept the weight down to a manageable 27-pounds
for the mount head but has kept the payload capacity up at an impressive
60-pounds.
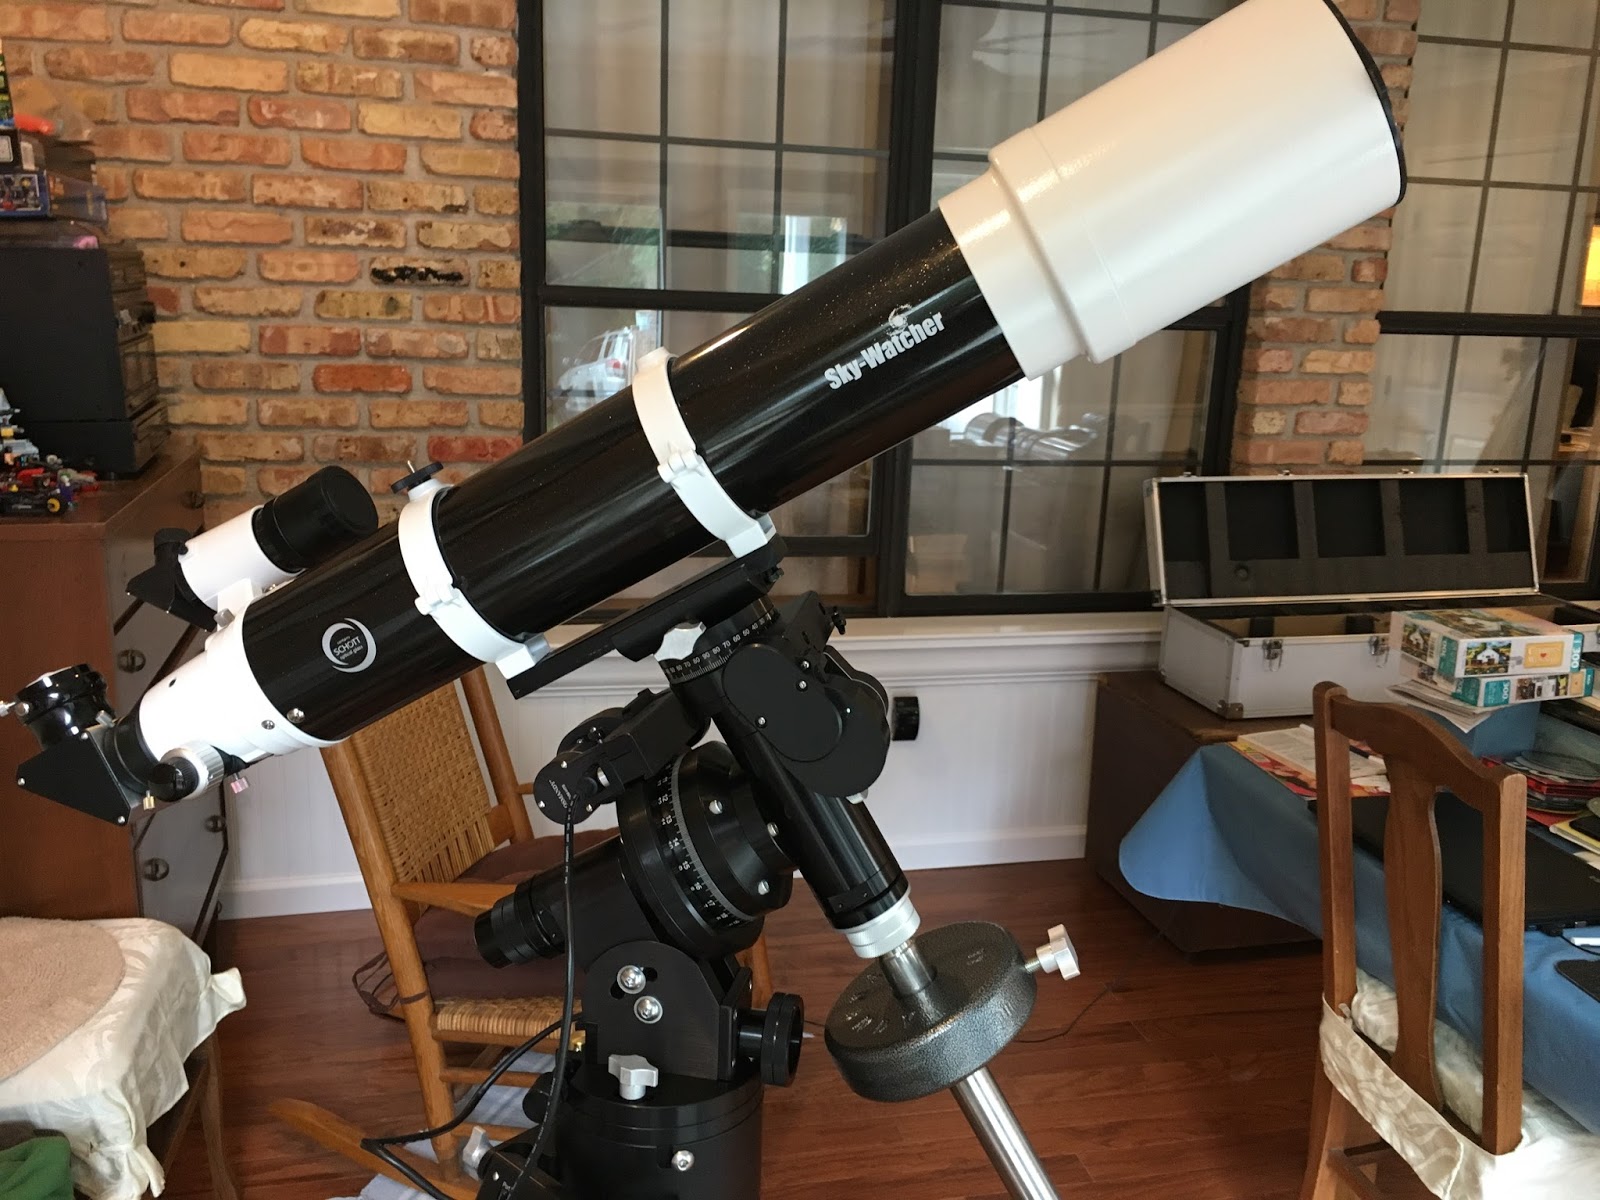
The other
mount candidate was a new one, the Losmandy GM811G. What’s different about this
GEM? It is a hybrid. Take the R.A.
assembly of a G11 and mate it with the declination assembly from a GM8. One
thing that impressed me about this one other than its good looks—its components
are beautifully machined rather than cast—was that it is almost a G11.

The Losmandy
G11 is a mount I’ve thought about a lot over the years. In most ways, it seems
perfect for me. Or would be if it weren’t just too heavy in these latter days. The
G11 head is 35-pounds, approaching Atlas territory, and the tripod is the same
35-pounds, twice what the Atlas and CGEM tripods weigh.
But then
came the “almost G11.” The GM811 has a payload capacity (which is stated to be
for imaging) of 50-pounds. But it packs that into a 27-pound package just like the CEM60.
The relatively light equatorial head would, I thought, allow me to use the
mount on Losmandy’s lightweight tripod, the LW, which is a couple of pounds lighter
than the Atlas/CGEM 2-inch stainless steel tripod. The GM811 is in the same price range as the CEM60, which made deciding all the more difficult.
Which should I choose? iOptron or
Losmandy? I thunk and I thunk and I thunk…
Pluses for
the CEM60? It’s, most of all, been on the street long enough now for the bugs
to be out. Yes, I know, it’s a mass produced Chinese mount and there can be
variation across samples, but from what I can tell, the chance of getting a
good one is high. And if you don’t, iOptron is famous for its good customer
support. Despite the odd center-balanced trope, the mount is familiar ground
for me. The hand control is much like what I am used to with the Celestron and
Meade HCs both in layout and operation.
There are
minuses, too. Not many, but some. Chief among them for me is that with the
CEM60 I would be covering the same old ground, for example hooking the mount to
my PC using a darned USB-serial converter. Also, while I think the CEM60 is
beautiful, there’s no denying the U.S. made Losmandy looks better with
anodized, machined components. Looks aren’t everything, of course. All cats are gray in the dark. But
maybe I just wanted something different
this time. Something other than the import mounts that have been my bread and
butter for over a decade.
What I liked
about the GM811G is pretty much laid out above. Great build quality and great
looks. And the mount delivers that at a price pretty much identical to what
you’d pay for the CEM60. Another plus is the innovative Gemini 2 goto system.
Not only do you have a color touch-screen HC, you can link the mount to a
computer via serial, USB, or, best of all, Ethernet.
No piece of
gear is without its failings, of course, and the GM811 had a few. Mainly having
to do with the Gemini 2 system, which I thought might be a minus as well as a
plus. It apparently had more than a few developmental problems early on.
However, my research quickly convinced me it is now a settled and stable
computer. It is somewhat different from what I’m used to with the NexStars and
Autostars, though. Couple that with the fact that there’s no manual for it,
just a collection of web pages. The one thing that made me hesitant about the
Losmandy mount was the Gemini 2.

Luckily, I’d
had a chance to see a Gemini equipped G11 in operation fairly recently, and
that took away some of my fear. Playing with the hand control simulator on the Gemini 2 web page also helped. A lot. So did
spending a couple of days reading and rereading and doing my best to understand
the instructions on the Gemini 2 site.
My
understanding of how Gemini 2 works began to improve when I grokked the fact
that what most often confused me was the author’s, Tom Hilton’s, tendency to
tell me more than I really wanted to know. Lots of information is a good thing,
usually, but sometimes I just want “how,” I don’t also want “why.” When I came
to this realization, I had an easier time understanding what the pages were
trying to say, skipping extraneous explanations.
If you’re a
Facebook friend, I’ve already spilled the beans as to my final decision there,
so I won’t keep the rest of you in suspense. The winner was the Losmandy GM811G—by a nose. I am more
than certain I could also have been happy with the CEM60, too.
And so, the
wait began, the dreaded wait for new astro-gear to arrive in the brown truck.
Looking at UPS Quantum View, I noted that the shipment would consist of three
packages, and that I could expect them between 4 and 7 p.m. Monday.
Naturally
Monday was a day of me being on pins and needles, and seemed to stretch on
forever. At least my prediction that the UPS dude wouldn’t show up till 7 was
wrong. The truck was in front of the house well before 5. My old friend Pat’s prognostication
also turned out to be wrong, thankfully—he’d predicted that I’d probably only
get two out of the three boxes on Monday.
Three
sizable but not enormous packages were soon in the front hall. Just as with the
CGEM, I thought the tall one, which was
kinda banged up, must contain the tripod. The heaviest must be the mount head,
and the next heaviest surely was the counterweight. Time to dig in.
The box
containing the CGEM head had been so heavy I’d had to slide it along on
the floor (on a towel) for part of the way to get it to the Sunroom, my usual
staging area. Not this time. The equivalent GM811 box was a little heavy, but not too heavy. The box that I presumed
contained the tripod was positively light.
In the
Sunroom, following my usual procedure, I began with the tripod (I did indeed choose the LW option). It was well packed and hadn’t suffered any damage at all, no
thanks to the tender mercies of UPS. All I had to do was spread the tripod legs,
tighten three knob-headed bolts, and I was done.

Then there
was the mount itself. That had to be what was in the heaviest box. Indeed, it
was. Well, that and a positively enormous counterweight bar, a stainless-steel job
1.25-inches in diameter, considerably larger (and heavier) than the skinny
counterweight shafts on my old Synta mounts. Now for the payoff, the GM811G
itself.
I pulled the
mount, which was in a plastic bag, out of the box (which was full of those
cornstarch packing peanuts that my young feline, Wilbur, immediately began
eating) and put the EQ head on the seat of a chair so I could free it from its plastic
bag. When it was out, I was bowled over by the GEM’s appearance. For someone
used to the cast aluminum of Chinese mounts, the GM811 was quite a revelation,
a machined beauty with no plastic. Man, those engraved R.A. and declination
setting circles are beautiful. I don’t know what I’ll do with them, but they sure are pretty.
Also in the
box was a couple of pages of brief assembly instructions. Brief, but
sufficient. With this mount, it’s pretty obvious where everything goes and how.
I am sometimes mechanically challenged, but I had no problem putting everything
together and really didn’t even need instructions.
The mount
head slides into the tripod head and fastens in place with three stainless
allen bolts. When I lifted the mount, and slid it into the tripod, I was again
impressed. It fitted into the tripod head easily and precisely; there was no
fiddling around required. Same for all the bolts and bolt holes on the mount.
They threaded in easily without any fuss at all.
Mount
secure, I threaded on that big counterweight bar and opened the final box.
Inside was an 11-pound Losmandy counterweight and assorted hardware including a
toe-saver for the counterweight bar and a set of allen wrenches—all the bolts
on the mount are hex-headed allen bolts.
Finally, there was the Gemini 2 computer, the hand control, the HC's coiled
cable, a cigarette lighter plug style DC power cable, and the optional 15-volt
AC supply I’d ordered. I might run the 811 on batteries on occasion, but I will
probably use it on AC most of the time.
Time to get
it going—in the house anyway. It was raining as I assembled the 811, and there
was absolutely no chance of me using it in the backyard on this night. Or the
next. Or the next. In a way, that was probably a good thing. It gave me a
chance to figure out the Gemini 2 system in the air-conditioned comfort of the sunroom.
When I’d
ordered the mount, I’d been torn about whether or not to order a second counterweight
with it. Would one 11-pounder be enough for my 120mm APO or my Edge 800? I
needn’t have worried. With the 120 onboard, I had to move the counterweight
almost to the top of its travel to balance thanks to that enormous
counterweight bar.

Next, I
plugged the R.A. and declination cables, which are terminated with DIN
connectors, into their respective receptacles on the Gemini computer and motors.
The motors on the GM811 are, by the way, the new “tucked” style. They are kinda
flipped around from the way they used to be, meaning there is little or no
chance of collisions.
Other than
that, all I had to do to get ready was mount the Gemini 2 computer to the
tripod with a couple of bolts, plug the hand control cable into the hand
control and into the proper RJ plug on the Gemini, and attach the AC power
supply.
So, here we
were at rubber meets road time. I turned
on the power switch and the HC greeted me with a color splash page and then offered
to let me calibrate the touch screen. The Gemini 2 instruction sheet informed
me that it had been calibrated at the factory, however, and that calibration
probably wouldn’t need to be done again, so I skipped that and was soon looking
at the startup page.
There, you
have several options including Quick Start, Cold Start, and Warm Start. I chose
Quick Start, which takes you through the process of entering the things all HCs
must know—latitude, longitude, time zone, etc., etc. That was easy enough to
do, and I was able to select and enter everything by just touching the screen.
Miss Dorothy, seeing what I was doing, found me a stylus designed for use with
smart phones, however, and that made using the touch screen more precise.
Especially when selecting smaller items like objects in a catalog list.
Once I was
done entering the needed info, I thought I’d do a couple of gotos, fake gotos,
to ensure everything was more or less well. With the 120mm refractor in the
home position, pointed “north” with the counterweight bar down, I told the 811
to go to Arcturus. Off the mount went, and wound up pointing in roughly the
proper direction given Arcturus’ current position.
How did she
sound? Pretty loud. Not as loud as my CGEM, but loud enough. At first I thought
I might need to adjust the worm gears as some new owners have reported they
needed to do (on a certain Internet astro-forum), but I didn’t get any stalls
or other errors, and decided that wasn’t necessary. Let’s face it, servo
motors, which the Losmandy mounts use, are just naturally louder than steppers.
The sound level wasn’t helped by the mount’s position inside near a brick wall,
either.

And the rain continued to fall. I did get some more things
accomplished indoors, however, installing the Gemini 2 ASCOM driver so I could
use the mount with my beloved Stellarium, and getting the Ethernet interface
sorted. While the Gemini 2 can communicate with a computer over either serial,
USB, or Ethernet connections, the Gemini 2 folks strongly suggest using
Ethernet. I am no stranger to working with LANs and Ethernet, so I thought I
might as well go that route.
Wednesday, my
movie day, I stopped at BestBuy on the way home and picked up an Ethernet
cable. Modern PCs don’t care whether you use a “patch” or “crossover” cable, so
I just bought what BestBuy had in the length I wanted, a 14-foot CAT 6 patch
cable.
Standing in
a long line at BestBuy turned out to be the hardest part of getting the mount
working with Ethernet. Back home, I entered an IP address and a few other
things in the laptop’s network setup, typed in http://gemini/, and was soon looking at the mount’s
web page. You can do quite a few things using the web interface, including
going to objects via a nice onscreen HC, and accomplishing many
setup/housekeeping tasks for the mount. I wanted Stellarium in the mix, though.
That turned
out to be even easier to set up than Ethernet. I downloaded and installed the
Gemini 2 ASCOM driver (which requires the latest version of the ASCOM platform),
selected it in StellariumScope, configured a few things in its set up window,
and was soon sending the mount on fake gotos from Stellarium’s beautiful sky
map. The Gemini 2 driver works perfectly with Stellarium and StellariumScope,
and can talk to the mount using Ethernet or serial interfaces. There’s also a
driver that allows you to use it with a USB connection if desired.
Then Wednesday
evening came and with it clearing. I really wanted to hit the backyard, but I
didn’t. It had rained at sundown, and the backyard was a damp, buggy, and humid
mess. I also had a road-trip scheduled for the morrow. Dorothy and I would be
going to Huntsville for the famous Huntsville Hamfest and to visit the Space and Rocket Center, so I didn’t want to
stay up all night long playing “How the heck do I get this darned mount to work?”
On our
return Saturday night, the sky was kinda-sorta OK, but very hazy. Unfortunately,
it was already getting dark and I was positively bushed after the drive. Sunday
was predicted to be better weather-wise anyway, so I put off the mount’s acid
test for yet another day.
Sunday found
me both excited and a little scared. The mount looked beautiful and seemed
to work well, but that was inside. How would it do under the stars? The GM811 was
new, and you know how it usually goes
with new gear out in the backyard for the first time. I expected frustration—if
not disaster—aided and abetted by sweltering nighttime temps, high humidity, and
flocks of mosquitoes.
 I was wrong. This
was the smoothest first light run I can remember having with any mount. Even to
include my CGEM, which, given its NexStar HC, was a known quantity for me. Admittedly,
I did keep it simple. I didn't try to take pictures or auto-guide or anything;
that will be for next time; I just wanted to polar align the mount, get it goto
aligned, and play around in the hazy and humid sky a bit.
I was wrong. This
was the smoothest first light run I can remember having with any mount. Even to
include my CGEM, which, given its NexStar HC, was a known quantity for me. Admittedly,
I did keep it simple. I didn't try to take pictures or auto-guide or anything;
that will be for next time; I just wanted to polar align the mount, get it goto
aligned, and play around in the hazy and humid sky a bit.
As soon as
there was a little shade on my accustomed observing location in the yard late
Sunday afternoon, I got the mount assembled with the SkyWatcher refractor
onboard. I sure was happy I’d chosen that LW tripod. It was less of a
strain on my back than even the standard Synta/Celestron tripods are. The mount
head? It was somewhat of a handful, but considerably easier to lift than the
CGEM or Atlas.
There wasn’t
much to assembly in the field. The bolts that hold the mount to the tripod can
stay threaded into the mount, just loosened. Unless you are traveling, you can
leave the Gemini 2 computer attached to the tripod. Other than attaching
mount to tripod, counterweight to mount, and telescope to mount (the GM811 will
accept either a Vixen or Losmandy “D” dovetail), all I had to do with plug in
the R.A. and dec cables, the power supply, and the hand control. I’d decided to
leave the PC for some other night.
Any mount
needs to be decently balanced, so that was the next step after assembly. Balancing
the GM811G was a positive joy. With the
friction clutches disengaged, the mount is free-wheeling in both declination and
R.A. There was most assuredly no need to guess at balance as I used to have to
do with my old CG5’s dec axis.
After
Polaris winked on, it was time for polar alignment. I moved the scope slightly
off north in declination to open up the hole in the counterweight bar so I
could center Polaris in the hollow polar bore (I chose not to order the polar
alignment scope). I then returned the tube to declination 90 and used Sharpcap’s
polar alignment tool to dial in the pole.
Polar
aligning the mount using Sharpcap, my wide-field guide scope, and my QHY5L-II guide
camera was a snap. The GM811’s azimuth adjusters, especially, are just so much better than those on many of the Chinese mounts. The mount’s altitude adjustment requires you loosen four allen
bolts, but that was not a big pain, and the mount stayed where it was in
altitude when I tightened them back up again. In the interest of keeping
my polar alignment good for a few days, I placed my Celestron vibration
suppression pads under each leg. Three paving blocks would work just as well,
however—or probably better.
 Following
polar alignment, I put the mount back in home position using a carpenter's
level to ensure the counterweight bar was straight down and the tube pointed
straight north. Then it was time.
Following
polar alignment, I put the mount back in home position using a carpenter's
level to ensure the counterweight bar was straight down and the tube pointed
straight north. Then it was time.
I turned on
the Gemini 2 computer and asked to build a model. What I did, as Losmandy
suggests in their (excellent) YouTube videos, was align on three stars in the
west (where I'd be doing most of my looking) and one in the east.
I chose
Arcturus as my first star, and when the slew stopped, it was in the field of my
12mm reticle eyepiece. Centered it and added Dubhe and Mizar. The touch-screen direction
buttons took a little getting used to, but after the first three stars I was
already used to them. I never felt moved to use the “tactile” buttons on the reverse
face of the HC. After lining up on the stars in the west, I selected
"east" in the model screen and added Deneb to the model (I didn't do
an east model, just added a star in the east to the west model to it to make
pointing better if I crossed the Meridian).
I got rid of
the reticle eyepiece and inserted a 13mm wide-field. Then, I went to the “goto
catalog objects” screen, selected “Messier,” and told the 811 to go to M3. The
mount slewed, the hand control declared "Goto done," and with some
trepidation I went to the eyepiece. There was the big glob sitting dead center
in the eyepiece, shining bravely through the haze and light pollution. I
followed M3 with M13, M15, M27, and as many others as I could think of. The Gemini
2 never missed, not even on objects east of the Meridian.
At this
point I was literally drenched in sweat and the bugs were biting. There was
just nothing for it; it was that dreaded time, time to pull the big switch. I
could have parked the scope and reused my alignment the next run, but the somewhat dire weather forecast suggested I'd be dissembling the mount and scope and returning them to the Sunroom on the morrow, so I didn't park, just killed the power.
So, were
there any problems or hiccups? Only one. I need to change the 811’s safety
limits a bit. The safety limits determine where the mount is in regard to the
Meridian when it does a Meridian flip, when it changes sides from east to west
or vice-versa. Get too close to the Meridian before doing that during a goto and
a longer-tubed telescope can bump into the tripod. As my f/7 refractor
threatened to do when I sent it to M57, which was near the Zenith. I had to
push the "stop" button on the HC to prevent a collision. I just need
to tell Gemini that it needs to do the flip a little sooner than what is
dictated by the default settings.
Otherwise, I
need to devise an accessory tray of some kind for the LW tripod, which doesn’t
have one. On this first night, I settled for setting up a folding aluminum camp
table next to the tripod to hold the HC, the mount power supply, and the power
brick for the DewBuster heaters.
Next time? I
intend to see how the new baby tracks and guides. Which is the ultimate test
for any telescope mount. We shall see, but based on my first light experience,
I believe this is the beginning of a beautiful friendship.
Sunday, August 06, 2017
Issue #546: Two Down, One to Go...

One more then, my friends, one more, a CGEM mount. I have absolutely loved using this Celestron German equatorial, but with my back twinging today, I know I have to let it go the way of the Atlas. If you've been following this saga on Facebook and here on blog, you know that after an accident, a fall, I had three years ago, I began having intermittent back problems. They come and they go, and one thing I have learned is not to aggravate them. Especially by lifting 40-pound GEM heads onto tripods.
Case in point? Last week, I was testing my Atlas EQ-G, which would be the first piece of "too heavy" gear to go up for sale. I was careful while putting it on its tripod and all seemed well. I had a lot of fun taking pictures with the mount, and had almost convinced myself to hang onto it. Until, when I was disassembling the Atlas after three days in the backyard, I--yep--aggravated my poor back again despite my caution. I knew then that both the Atlas and the CGEM just had to go.
As for the current item, my CGEM, I've had a lot of fun with it in the couple of years I had it and will miss it. The mount never failed me, never prevented me from doing what I wanted to do in video, visual observing and long exposure deep sky imaging. You can read about some of our exploits here and here. Certainly I'll be sorry to see the mount go, but I plan to, as I mentioned a while back, replace it with a lighter GEM with a similar payload capacity.
Anyway, the CGEM is just over two years old and includes the standard NexStar hand controller, a DC power cord, AND the optional (and not exactly inexpensive) 5-amp Celestron AC power supply. The counterweight is the single 17-pound job normally included with the mount, but any CG5/Synta type counterweight will work on this mount.

This is priced to MOVE at $800.00, little more than half its price two years ago. Like the Atlas, this is a PICKUP ONLY item, but, as with them, I am willing to drive a reasonable distance to meet somebody--New Orleans, Montgomery, Pensacola, Panama City, etc.
Please note that the TPI spreader shown in some of the pictures is NOT included. I have moved that to my AVX.
Oh, one last thing to add to the pile of loot. I've realized that after I sell the CGEM, I'll have no further use for my ADM Vixen to Losmandy adapter, so that goes with the mount too.
If you're interested, the best way to contact me is via Facebook Messenger. I do still monitor my old email addy at rmollise@bellsouth.net, however... If you think the CGEM might be just the thing for your observing program, I urge you to contact me without delay. It won't, I presume, last at this price.
![]()

